Dual Plexi Amplifier

Specs
- Two voices are selectable from the front panel gain switch. Lower gain 1965 plexi specs, and higher gain 1968 plexi specs.
- Single input that internally jumpers the 2 channels together. Normal volume and Bright volume are both always active.
- Cut switch (front panel).
- Drive control.
- Power Scale master wattage.
- Foot switchable boost.
- EQ bypass when boost is activated (rear panel switch).
- Tube buffered effects loop with foot switchable bypass.
- Custom Made in Canada toroidal transformers.
- 3 tube power amp.
- Ultralinear option (rear panel switch).
- Aluminum chassis with welded seams.

Front Panel
Gain - Normal - Bright - Treble - Mid - Bass - Drive - Cut - Fat - Power Scale - On/Off
Gain, Normal and Bright
- Gain switch toggles between 2 voices. Up position is the higher gain setting.
- Normal and Bright are in parallel and both are always active. Normal has more bass. Bright has more gain and more focus.
- Dial in the desired amount of gain with the Bright volume, then blend in the desired amount of bass (fulness) with the Normal Volume.

EQ Bypass Switch
- This switch is used to engage the EQ bypass when the foot-switchable boost circuit is turned On.
- With the switch in the Up position, the EQ will be bypassed whenever the boost is active.
- With the switch in the down position, the EQ will always be active.

Drive
- Drive controls the signal fed to the effects loop and power amp section.
- The Cut switch works in conjunction with the Drive control.
- The lower the Drive control is set, the more impact the Cut switch has.
- The Cut switch is especially useful at lower volume settings when a thicker tone is desired.

FAT and Power Scale
- FAT controls the body and gain of the power amp.
- Power Scale is the wattage control system licensed under an agreement with London Power.
- Here is an example of a couple of settings:
Full setting = max wattage (30 watts)
½ setting = 8 watts
¼ setting = 1 watt

Rear Panel
- Ultralinear is a 50’s hi-fi type of sound that simulates triode operation. The output transformer has a special set of taps for ultra-linear operation. The switch toggles between the triode sound and the standard British sound.
- The footswitch jack is a ¼ inch stereo connector.
- The footswitch controls the internal boost and the effects loop.

Power Amp Valve Select
- These switches are used to engage the desired power tubes.
- EL84 turns the EL84 on and off
- V-2 turns the power tube located in the V2 socket on and off.
- V-3 turns the power tube located in the V-3 socket on and off.
- V-2 and V-3 can be: 6V6, 6L6, EL34, KT66, 6550.
- The EL84 blends especially well with 6V6 tubes.

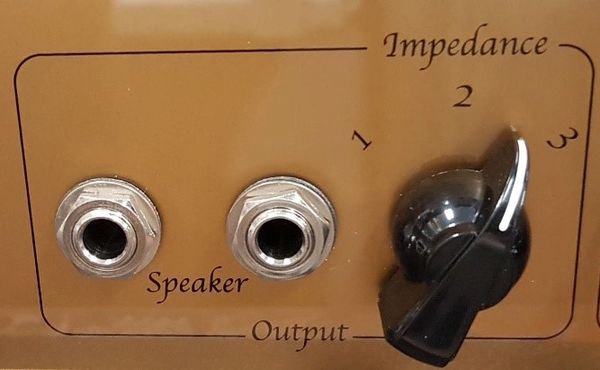
Output
- This is the speaker output section.
- The Impedance selector is labelled 1-2-3 since the amp can accommodate different types of power tubes. Depending on what tubes are being used and what tubes are turned on will determine what setting sounds best.
- When using EL34’s and the EL84 turned off, I think of this selector as 4-8-16.
- When using a pair of 6V6’s and the EL84 turned off, I think of this selector as 8-16-32.

Effects Loop
- Dial-in the Send to a level that does not overload the effects unit.
- Dial-in the Return to bring the volume of the overall effect to the desired level.
Effects Loop Mode of Operation
- This switch controls the Effect Loop mode of operation and is located by the V-3 power tube.
- The 2 modes are:
- Series. The preamp signal leaves the amp, goes through the effects and returns back into the amp.
- Parallel. A portion of the preamp signal leaves the amp to feed the effects unit. Meanwhile, the amp’s raw tube tone flows unaffected through the amp. The send and return controls are used to blend the wet and dry together for the desired effect.

Effects Loop Switch
This switch controls the Effect Loop mode of operation and is located by the V-3 power tube.
The 2 modes are:
- series. The preamp signal leaves the amp, goes through the effects and returns back into the amp.
- parallel. A portion of the preamp signal leaves the amp to feed the effects unit. Meanwhile, the amp’s raw tube tone flows unaffected through the amp. The send and return controls are used to blend the wet and dry together for the desired effect.

Chassis
The top row of tubes are as follows:
- Top right closest to input jack. 12AX7 for the preamp.
- 2nd tube from input jack. 12AX7 for the EQ.
- 3rd tube from input jack. 6SN7 for the effects loop.
- 4th tube from input jack. 6SN7 for the phase inverter
Tubes
- The 9 pin socket on the left is for the EL84. It’s back panel on/off switch is labelled EL84.
- The middle socket is an 8pin octal type and can run a variety of power tubes. It’s back panel on/off switch is labelled V-2
- The 8 pin octal socket located on the right side can also run a variety of power tube types. It’s back panel on/off switch is labelled V-3.
The Dual Plexi is priced at $3200
All prices are in USD and do not include shipping or taxes. There is an approximate 6 month backlog at this time. A $1500 deposit is required to get on the amplifier build list, the balance is then due when the amplifier is ready to ship.
Stephenson Amplification Inc.